XXL Kit for Arduino · Music and movement
Part 22 A stepper motor and a buzzer: a dancing music box
- Beginner
- Ages 8+
- about 60 min
In this part you will build a music box: you press a button, the buzzer plays “Wlazł kotek na płotek”, a Polish children's song, and a little dancer on the shaft of a stepper motor sways to the rhythm of the melody. Every note is one move. On the way you will meet a new part of the kit, the 28BYJ-48 stepper motor, and find out how it differs from the servo from Part 7. The choreography is written in the code as an ordinary array: change the numbers and the dance changes.
Who is it for? For children and teenagers aged 8 and up, for teachers, and for adults who have done Parts 5, 6, 7 and 20: it helps to know the button with INPUT_PULLUP, the tone() function, the Servo library and arrays of notes.
01
A music box that dances
A classic music box is two things at once: a melody and a turning figurine. In this part the buzzer plays the melody and the stepper motor turns the figurine.
In a real music box, once you wind up the spring, a cylinder with little pins on it turns. The pins pluck metal tongues, and that is where the sound comes from. The same spring turns the ballerina. Music and movement are joined mechanically. Here you join them in the code: the program takes the next note, starts it on the buzzer and, for exactly the same time, turns the motor left or right. A short note, a short move. A long note, a long move or a frozen pose.
The whole “dance” is three arrays of numbers set side by side:
| Array | What is in it | Example |
|---|---|---|
MELODY[] | the pitch of each note (in hertz) | SOL, MI, MI, FA … |
DURATIONS[] | the length of each note (in milliseconds) | 500, 250, 250, 500 … |
MOVES[] | what the dancer does during the note: 1 right, -1 left, 0 stands still | 1, -1, -1, 1 … |
You already know arrays from the piano in Part 20. What is new is that you read three arrays in parallel: element number 3 in each of them describes the same moment of the tune.
02
The 28BYJ-48 stepper motor and the ULN2003 driver
A part from the catalog in Part 1 (item 30). This is the first time you really connect it.
From the kit
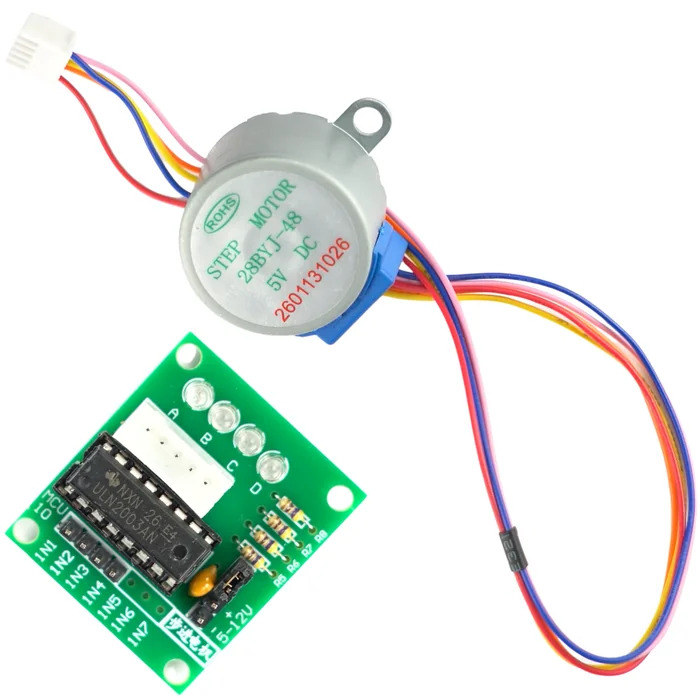
28BYJ-48 stepper motor and ULN2003 driver
Movement measured out step by step. The motor does not just spin any old way. It jumps in tiny steps that are always the same size: 2048 steps for one full turn of the shaft. The ULN2003 driver is a small board that goes between the Arduino and the motor.
How it works inside. Inside the motor there are coils, which are electromagnets arranged in a circle, and a magnet sits on the axle. The Arduino turns the coils on one after another, and each time the magnet jumps toward the one that is on right now. One such jump is one step. Turn the coils on faster and the motor spins faster. Turn them on in the opposite order and it spins the other way. Behind the magnet there is also a plastic gearbox (small gear wheels, about 1:64), which changes many tiny steps into one slow but strong turn of the shaft. That is where the 2048 steps per turn come from, and the slowness too: this motor does at most about 15 turns per minute.
What the ULN2003 driver is for. An Arduino pin can safely give about 20 mA, which is what an LED needs. A coil of the motor needs several times more. On the driver board sits the ULN2003 chip, a set of electronic switches: the Arduino only says “turn on coil number 2”, and the current for the coil flows from the power supply, not from the pin. Four LEDs marked A, B, C, D show which coil is on at the moment. In the music box they will blink to the rhythm of the dance like stage lights.
The driver has:
| Pin | Function | Where it goes |
|---|---|---|
IN1–IN4 | control signals for the four coils | four digital pins of the Arduino |
+ (labeled 5-12V) | power for the motor | 5 V of the R3 board |
- | ground | GND of the R3 board |
| white 5-pin socket | the motor's plug | goes in only one way round |
jumper next to + and - | power switch for the motor | must be in place |
The motor in the kit is the 5 V version. Although the driver says 5-12V, you connect it to 5 V.
03
A stepper motor or a servo?
Both parts move when the Arduino tells them to, but they think about movement in completely different ways.
From the kit
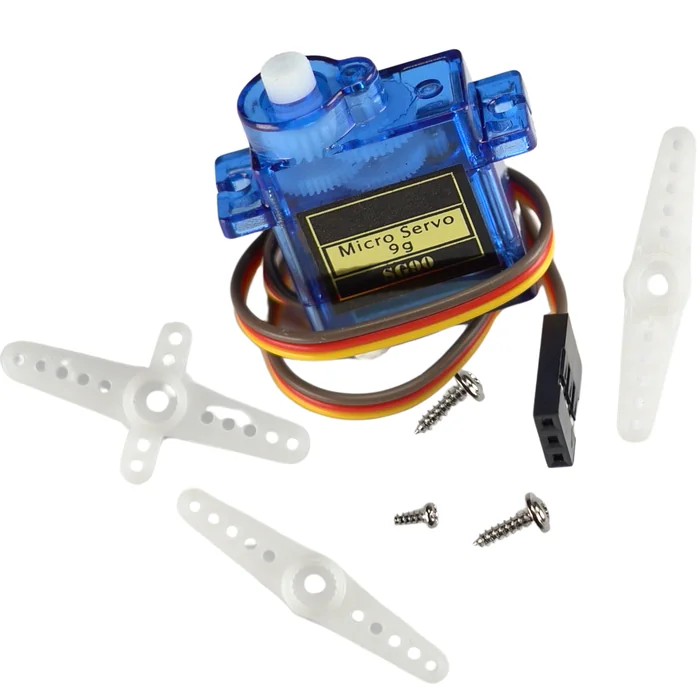
SG90 servo – for comparison
“Move to 90 degrees.” The servo from Part 7 gets an angle and travels there by itself. You do not connect it to the music box. It is here only so that you can see the difference.
You tell a servo where to be. You tell a stepper motor how far to move. Everything else follows from this one difference:
| Feature | SG90 servo (Part 7) | 28BYJ-48 stepper motor |
|---|---|---|
| Command | servo.write(90) – move to 90° | motor.step(512) – make 512 steps |
| Range of movement | from 0° to 180°, no further | no limits – as many turns as you like, both ways |
| How it knows where it is | it has a position sensor inside | it does not know – the Arduino counts the steps; after power-on, “zero” is wherever the shaft happens to be |
| Accuracy | about 1° | 1/2048 of a turn, which is about 0.2° |
| Speed | fast – half a turn in a fraction of a second | slow – at most about 15 turns per minute |
| Pins | 1 signal pin | 4 signal pins plus the driver board |
| Library | Servo.h | Stepper.h |
| Current drawn at rest | small | the coils heat up as long as they are on – it is worth turning them off after a move |
| Good for | a barrier gate, a gauge needle, an arm, a gripper | a turntable, a music box, a clock, anything that goes round and round |
A stepper motor suits the music box better for two reasons. First, the dancer can turn as much as it likes, while a servo would have to turn back after 180°. Second, since the Arduino counts every step, after the dance it knows how far it has gone from the start and can return exactly to the place where the dancer began.
04
Reminder: the passive buzzer and the button
You got to know these parts fully in Parts 5 and 6. This is only a quick refresher.
From the kit
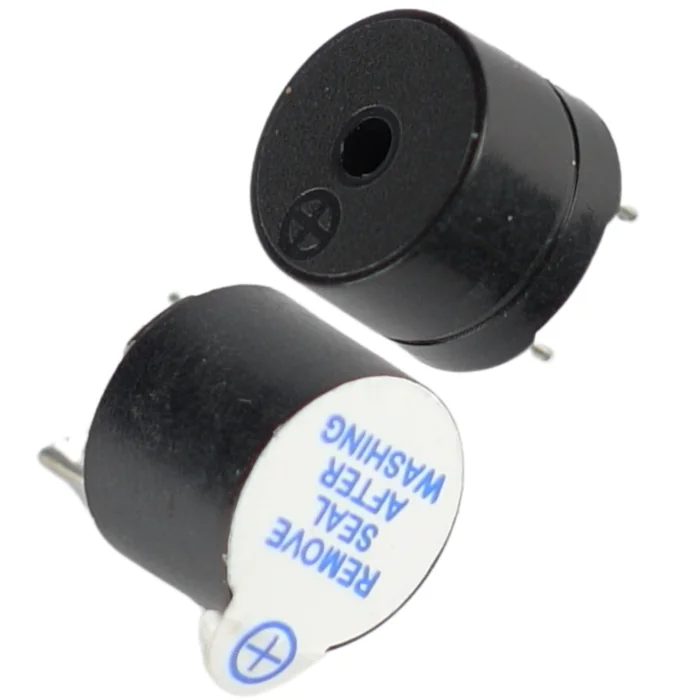
Passive buzzer
It plays the melody. The function tone(pin, frequency) starts a sound that keeps playing by itself, in the background, until you call noTone(pin). You need the passive buzzer. The active one always beeps with the same tone.
From the kit
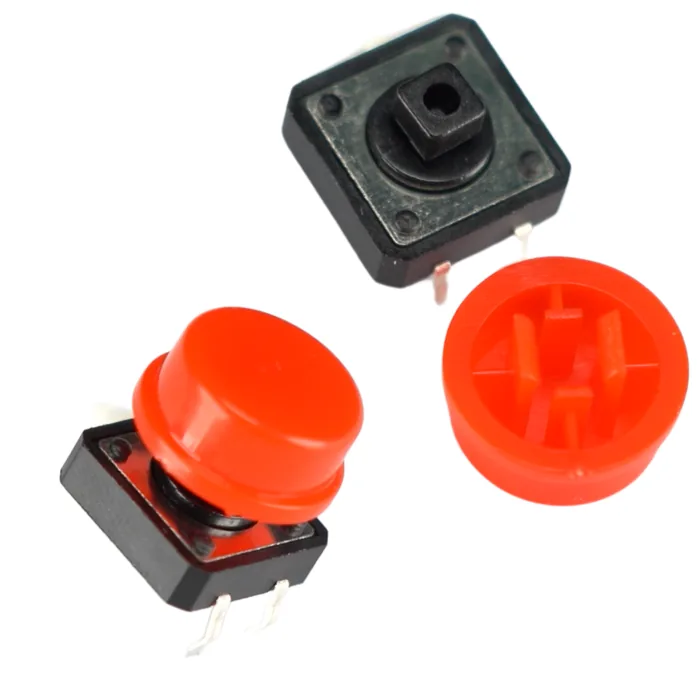
Tact switch (button)
It winds up the music box. Connected with INPUT_PULLUP: released it gives HIGH, pressed it gives LOW. The full explanation is in Part 5.
The fact that tone() plays in the background is the key to this project. The stepper motor turns inside the function motor.step(), which holds the program until the move is finished. If the sound also needed the program's attention all the time, one would have to wait for the other. This way you start the note, then the move, and the note sounds by itself for the whole move.
05
Building the circuit
Four signals to the driver, one to the buzzer, one from the button.
What you need: the R3 board, the 28BYJ-48 stepper motor with the ULN2003 driver, the passive buzzer, a tact switch, the breadboard, 6 female-to-male jumper wires (the pins of the driver are little posts that stick out, so you connect to them with the female end), about 5 male-to-male jumper wires and, if you make the dancer yourself instead of using a ready-made figurine, one more male-to-male jumper wire.
| Part | Pin | Board pin | Note |
|---|---|---|---|
| ULN2003 driver | IN1 | D8 | – |
| ULN2003 driver | IN2 | D9 | – |
| ULN2003 driver | IN3 | D10 | – |
| ULN2003 driver | IN4 | D11 | – |
| ULN2003 driver | + | 5 V | power for the motor |
| ULN2003 driver | - | GND | – |
| 28BYJ-48 motor | white plug | socket on the driver | goes in only one way round |
| Passive buzzer | “+” (or the longer leg) | D5 | signal from tone() |
| Passive buzzer | “–” | GND | – |
| Tact switch | one leg | D2 | INPUT_PULLUP |
| Tact switch | leg diagonally opposite | GND | – |
  ULN2003 DRIVER                        28BYJ-48 MOTOR
  D8  --- IN1                           +-----------+
  D9  --- IN2           [socket] <======| plug      |
  D10 --- IN3                           +-----------+
  D11 --- IN4
  5V  --- +   (the jumper next to it must be in place)
  GND --- -

  BUZZER (sound):
  D5 --| buzzer |-- GND      "+" (or the longer leg) on the side of pin D5

  BUTTON ("winding up" the music box):
  D2 --[ button ]-- GND      INPUT_PULLUP: released = HIGH, pressed = LOW
This is the whole circuit on the wiring diagram:
Step-by-step assembly
Build the circuit on the breadboard
Loading the 3D view...
Connect the motor to the driver
Plug the white plug of the motor into the socket of the ULN2003 driver. Check that the jumper next to the + and - pins is in place.
A figurine or your own dancer. To get the effect of a real music box, something should turn on the shaft of the motor. Do you have a small figurine at home, a toy from a surprise egg or a Christmas tree ornament? Fit it on the shaft and you are done. That is the simplest way to a nice effect. Nothing at hand? Make a dancer yourself from one male-to-male jumper wire: wrap its middle tightly around the shaft two or three times and spread the ends out to the sides like arms. Either way it helps that the shaft has two flat sides: whatever you put on it does not slip. Stand the motor on the table with the shaft pointing up, so that you can see the dance well and easily check whether the dancer returns exactly to the start when the tune is over.
Order of assembly:
- 1Plug the white plug of the motor into the socket of the driver. Check that the jumper next to the
+and-pins is in place. - 2With female-to-male jumper wires connect
IN1,IN2,IN3,IN4to pins D8, D9, D10, D11, in that order. - 3In the same way connect the
+of the driver to the 5 V pin and the-to the GND pin of the R3 board. - 4Plug the buzzer into the breadboard: “+” with a jumper wire to D5, “–” to GND.
- 5Plug in the button straddling the groove of the breadboard: one leg with a jumper wire to D2, the leg diagonally opposite to GND.
- 6Wrap the dancer wire around the shaft.
- 7Check everything once more. Only now plug in the USB cable.
06
The program step by step
First you check that the motor turns both ways. Only then do you teach it to dance.
For the stepper motor you will use the Stepper library. Like Servo in Part 7, it is built into Arduino and usually does not have to be added. In the project of this lesson FlashESP has added it anyway, so you have nothing to do.
Motor test – do this first. This program turns the shaft one full turn one way, waits a second and comes back with a full turn the other way:
#include <Stepper.h>   // library for stepper motors

const int STEPS_PER_TURN = 2048;   // the shaft makes this many steps in one full turn

// Order of the pins: IN1, IN3, IN2, IN4 - this is not a mistake, it is explained below
Stepper motor(STEPS_PER_TURN, 8, 10, 9, 11);

void setup() {
  motor.setSpeed(10);   // speed in turns per minute
}

void loop() {
  motor.step(STEPS_PER_TURN);    // a full turn one way
  delay(1000);
  motor.step(-STEPS_PER_TURN);   // minus = the other way
  delay(1000);
}
Flash the code to the board through FlashESP.com, as in the earlier parts. The dancer should make a full turn, stop, come back, and so on round and round, and the LEDs A–D on the driver should blink with every move.
Why pins 8, 10, 9, 11 and not 8, 9, 10, 11? The Stepper library wants the pins in a different order from the way they are numbered on the driver: first both ends of one coil, then both ends of the other. In the 28BYJ-48 motor these happen to be IN1 with IN3 and IN2 with IN4. You do not move any wires. It is enough to swap two numbers in the code. If you type 8, 9, 10, 11, the motor will only tremble and hum instead of turning, or it will always turn the same way.
When the test works, flash the final program:
#include <Stepper.h>   // library for stepper motors

const int STEPS_PER_TURN = 2048;   // the shaft makes this many steps in one full turn
const int TURNS_PER_MINUTE = 12;   // speed of the dance - this motor does not like more than about 15

// Order of the pins: IN1, IN3, IN2, IN4 - the same as in the test
Stepper motor(STEPS_PER_TURN, 8, 10, 9, 11);

const int buzzerPin = 5;
const int buttonPin = 2;

// Notes in hertz - an octave higher than in the textbook, as in Part 20,
// because the small buzzer plays clearly louder there
const int DO  = 523;
const int RE  = 587;
const int MI  = 659;
const int FA  = 698;
const int SOL = 784;

// "Wlazl kotek na plotek" - two lines of the song, 9 notes each
const int MELODY[] = {
  SOL, MI, MI, FA, RE, RE, DO, MI, SOL,
  SOL, MI, MI, FA, RE, RE, DO, MI, DO
};

// Length of each note in milliseconds
const int DURATIONS[] = {
  500, 250, 250, 500, 250, 250, 250, 250, 1000,
  500, 250, 250, 500, 250, 250, 250, 250, 1000
};

// Choreography - what the dancer does during each note:
//   1 = turn right,  -1 = turn left,  0 = stand still and hold the pose
// The second line is a mirror image of the first.
const int MOVES[] = {
   1, -1, -1,  1, -1, -1,  1,  1,  0,
  -1,  1,  1, -1,  1,  1, -1, -1,  0
};

const int NOTE_COUNT = 18;

long position = 0;   // how many steps the dancer has moved away from the starting place

// Turns off all four coils - the motor rests and does not heat up
void turnOffCoils() {
  digitalWrite(8, LOW);
  digitalWrite(9, LOW);
  digitalWrite(10, LOW);
  digitalWrite(11, LOW);
}

// Plays the whole melody and makes one move of the choreography with each note
void playAndDance() {
  for (int i = 0; i < NOTE_COUNT; i++) {
    tone(buzzerPin, MELODY[i]);   // the note starts playing and keeps playing by itself, in the background

    if (MOVES[i] == 0) {
      delay(DURATIONS[i]);        // the dancer stands still for the whole note
    } else {
      // how many steps fit into this note at our speed
      long steps = (long)DURATIONS[i] * STEPS_PER_TURN * TURNS_PER_MINUTE / 60000;
      motor.step(steps * MOVES[i]);           // the move lasts exactly as long as the note
      position = position + steps * MOVES[i]; // remember where we are
    }

    noTone(buzzerPin);
    delay(40);   // a short silence between the notes - it lets you hear the rhythm
  }
}

// Returns exactly to the place where the dancer started
void returnToStart() {
  motor.step(-position);
  position = 0;
}

void setup() {
  pinMode(buzzerPin, OUTPUT);
  pinMode(buttonPin, INPUT_PULLUP);
  motor.setSpeed(TURNS_PER_MINUTE);
}

void loop() {
  if (digitalRead(buttonPin) == LOW) {   // button pressed - we "wind up" the music box
    playAndDance();
    returnToStart();
    turnOffCoils();
  }
}
Write this program in your browser
Tutorial on the left, editor on the right. Build your code and flash it to the board in one click, with nothing to install.
| Instruction | What it does |
|---|---|
Stepper motor(2048, 8, 10, 9, 11) | creates the motor object: the steps per turn and the four pins in the order the library needs |
motor.setSpeed(12) | sets the speed in turns per minute – it does not move the motor by itself |
motor.step(steps) | makes the given number of steps; a negative number means the other way. The program waits until the move is finished |
MELODY[i], DURATIONS[i], MOVES[i] | three arrays read in parallel – the same number i is the same moment of the tune |
(long)DURATIONS[i] * 2048 * 12 / 60000 | converts the length of a note to a number of steps: at 12 turns per minute a 250 ms note is 102 steps, which is about 18° |
position = position + … | the Arduino adds up all the steps – this is how a stepper motor “knows” where it is, although it has no position sensor |
motor.step(-position) | goes back exactly as many steps as it has traveled in total – the dancer stops where it started |
turnOffCoils() | turns off all four coils; without it the current keeps flowing through them after the move and the motor heats up |
This program uses the library Stepper 1.1.3. It is already added to the project in the editor next to the lesson.
Press the button. You will hear “Wlazł kotek na płotek”, and the dancer will sway to the rhythm: right on the long notes, twice left on the short ones, and it will freeze at the end of the line. The second line is a mirror image of the first. After the last note the dancer will calmly return to the start, and the LEDs on the driver will go out.
Why (long). The multiplication 250 * 2048 * 12 gives more than 6 million. An ordinary int variable on the ATmega328 holds at most 32,767, so the result would “wrap around” and the motor would make a completely different move. The little word (long) in front of the first number tells the program to calculate with the much bigger type long, which holds more than two billion.
Make up your own dance. Change only the numbers in the MOVES[] array. The melody and the rest of the program stay as they are. A few ideas:
- all
1– the dancer spins round and round one way, like the ballerina in a real music box, - alternating
1, -1, 1, -1– quick swaying, - more zeros – the dancer stops in poses, as in the game “Red light, green light”.
Whatever you type, returnToStart() will still lead the dancer back to its place. Just make sure that all three arrays have the same number of elements, equal to NOTE_COUNT.
Build checklist
Tick them off one by one. Your progress is saved in this browser.
0 / 21
Rules worth remembering
- 1
A stepper motor always goes through a driver.
Never connect the wires of the motor straight to the pins of the Arduino. A pin cannot give as much current as a coil needs, and you can damage it.
- 2
Under load, a separate power supply.
A light dancer (a wire or a small figurine) will manage on the 5 V pin of the board. If something heavier goes on the shaft and the board starts to reset, the motor needs its own 5 V source (for example a 5 V power adapter), and its ground must be connected to the GND of the Arduino, just as with the servo in Part 7. Do not connect the 9 V battery to the driver: the motor in the kit is made for 5 V.
- 3
After the move, turn off the coils.
A motor that stands still with its coils on keeps drawing current and gets warm. The function
turnOffCoils()turns off all four when the dance is over. - 4
We rewire the circuit with the power disconnected.
Pull out the USB cable, move the wires, check once more and only then plug it back in.
Projects
None of the projects below needs anything extra: everything is already in the kit. They go roughly from the easiest to the most ambitious.
- 1
A pirouette at the end
Easy- What you will use
- this circuit
- What you will learn
- adding one full turn after the melody (
motor.step(2048)) as a bow to the audience
- 2
A music box that plays on and on
Easy- What you will use
- this circuit
- What you will learn
- changing the program so that one press starts playing without end and a second press stops it
- 3
A new melody, a new dance
Medium- What you will use
- this circuit
- What you will learn
- rewriting another song as three arrays – notes, durations and moves – and adjusting
NOTE_COUNT
- 4
Tempo from the potentiometer
Medium- What you will use
- this circuit + the potentiometer from Part 5
- What you will learn
- scaling all the
DURATIONS[]by one multiplier, so that the melody and the dance speed up together
- 5
A dance for two dancers
Challenging- What you will use
- this circuit + the servo from Part 7
- What you will learn
- combining two kinds of movement: the motor turns while the servo waves an “arm” by a set angle at the same time
Summary
This part introduced the last big actuator of the kit: the 28BYJ-48 stepper motor with the ULN2003 driver. You saw that a stepper motor does not get an angle like a servo, but a number of steps, and that it is the Arduino that remembers where the shaft is. That is why the dancer returns exactly to the start, although there is no position sensor inside the motor. The music box joined sound and movement because tone() plays in the background while motor.step() moves the dancer for exactly as long as the note lasts. For now the choreography is written into the code: to change the dance you have to change the array and flash the program again.